

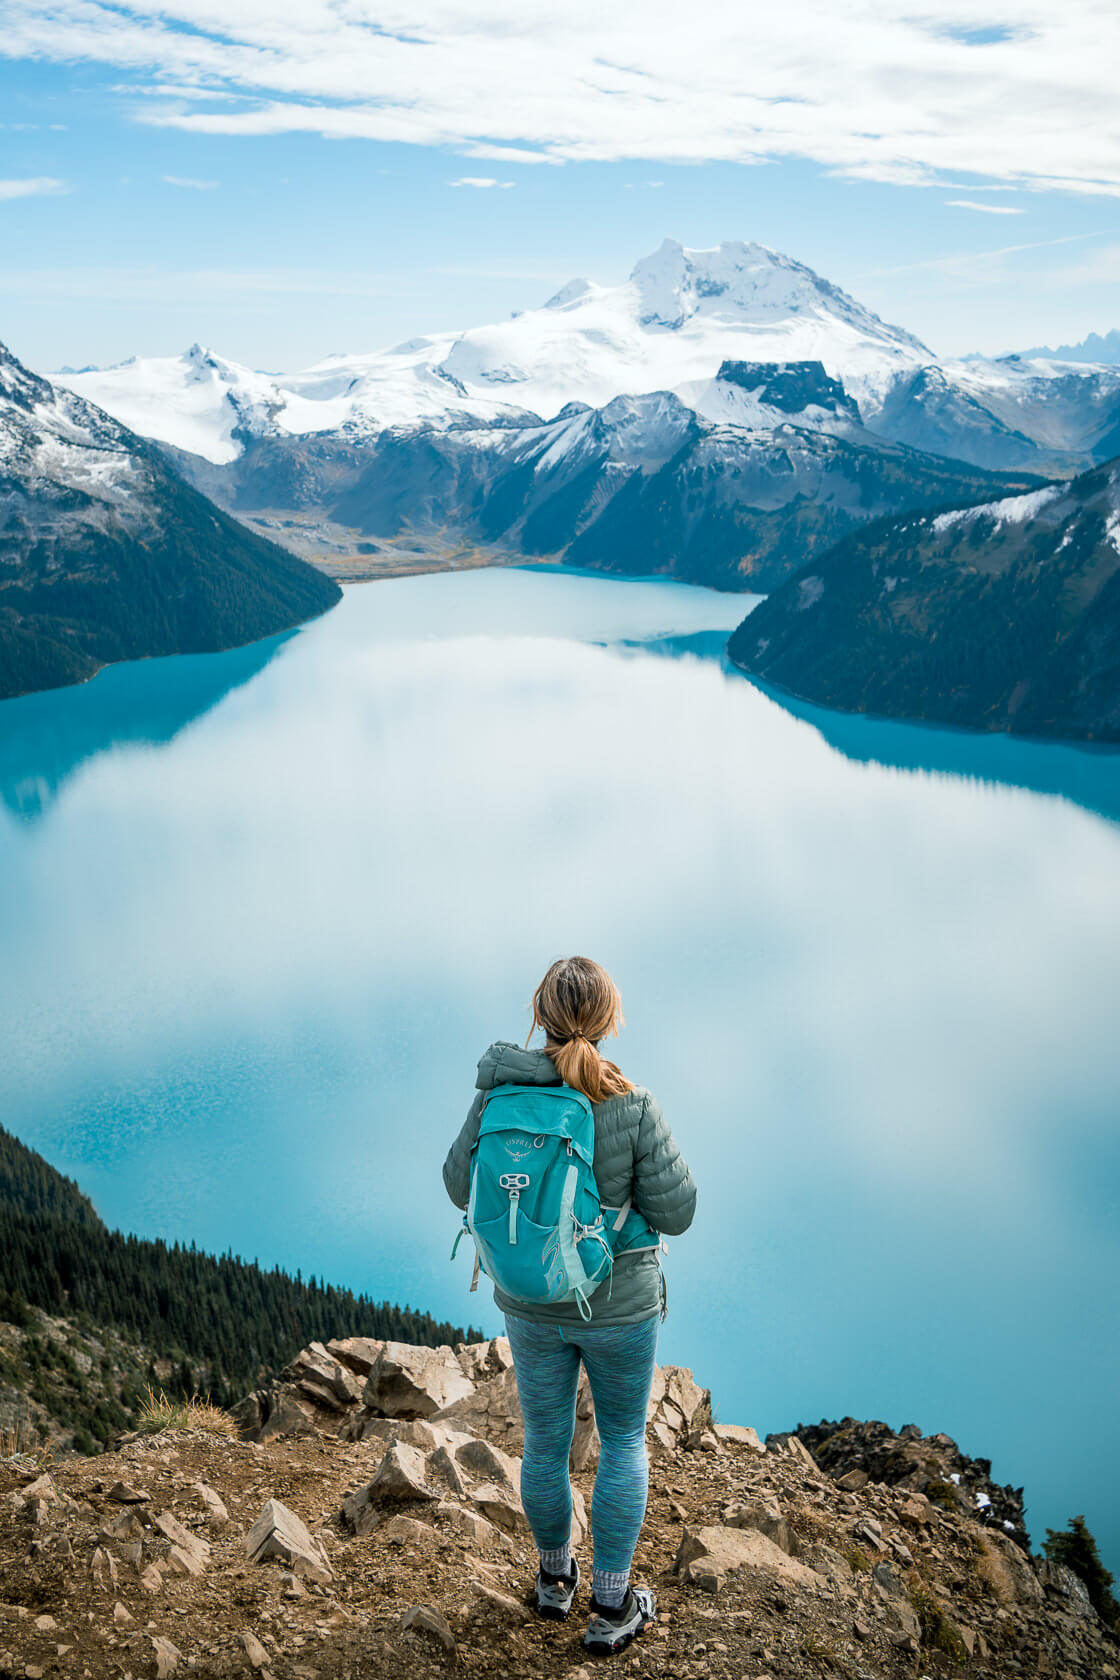
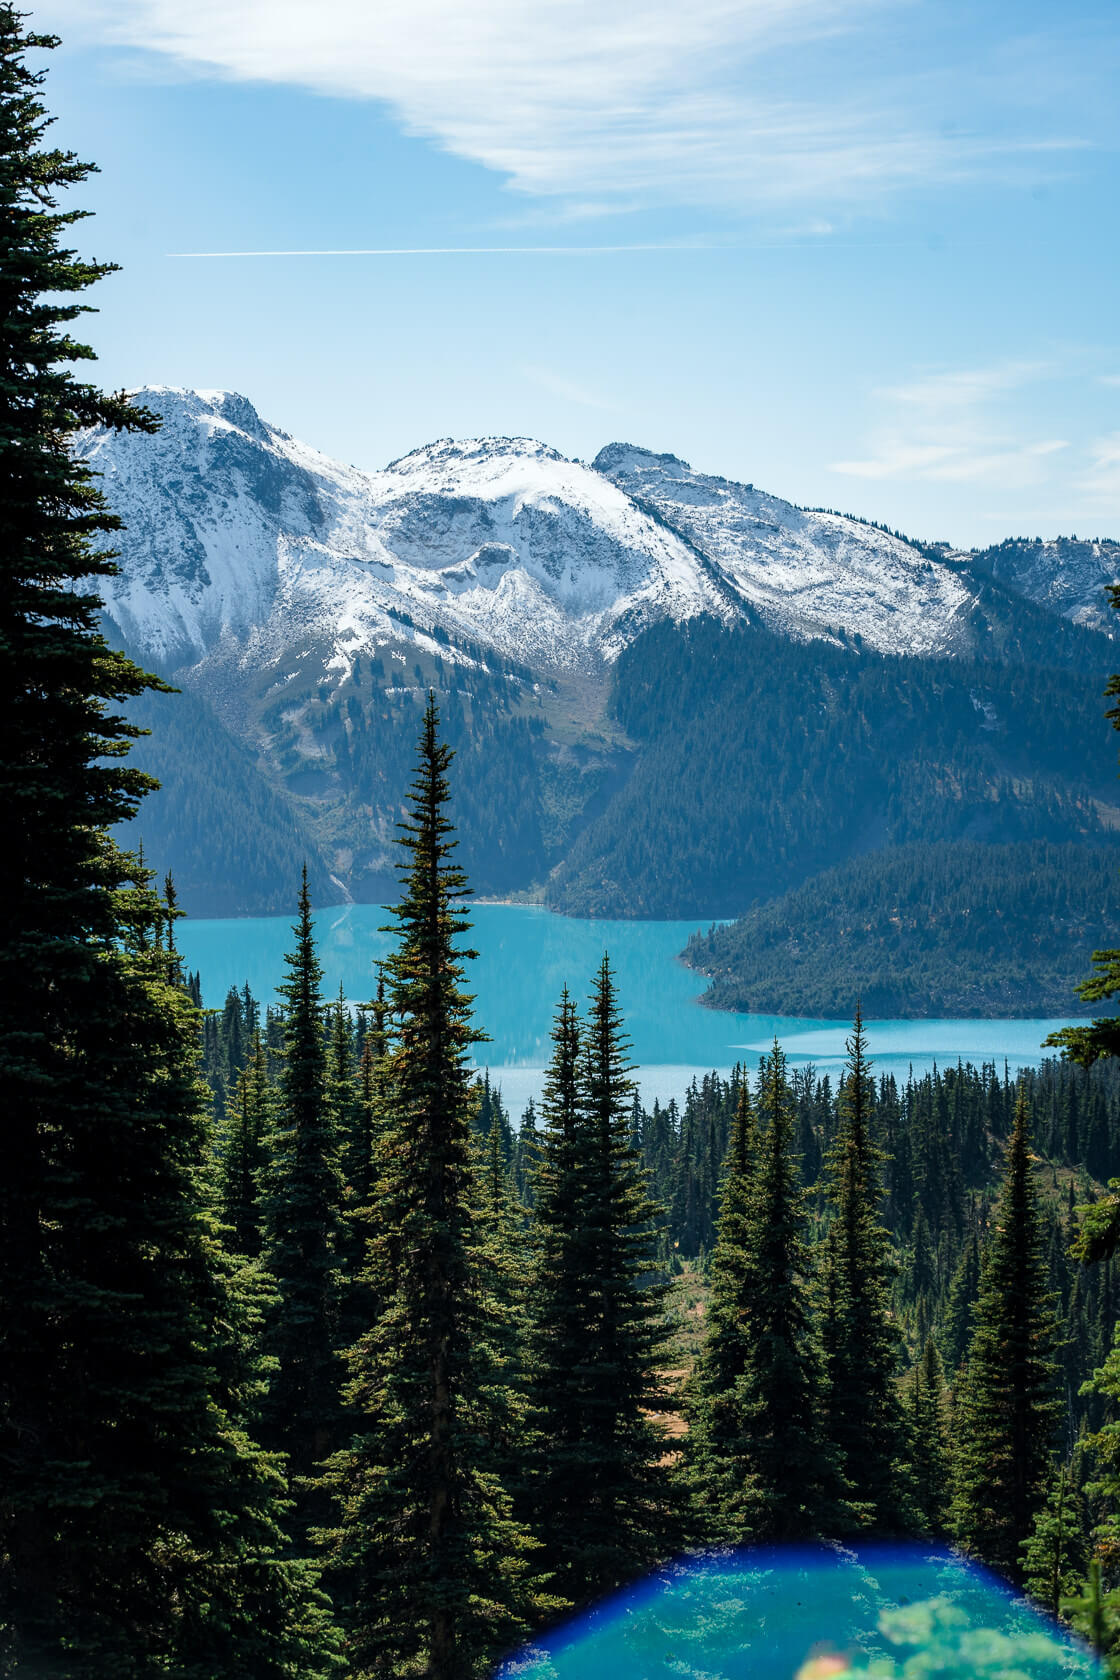
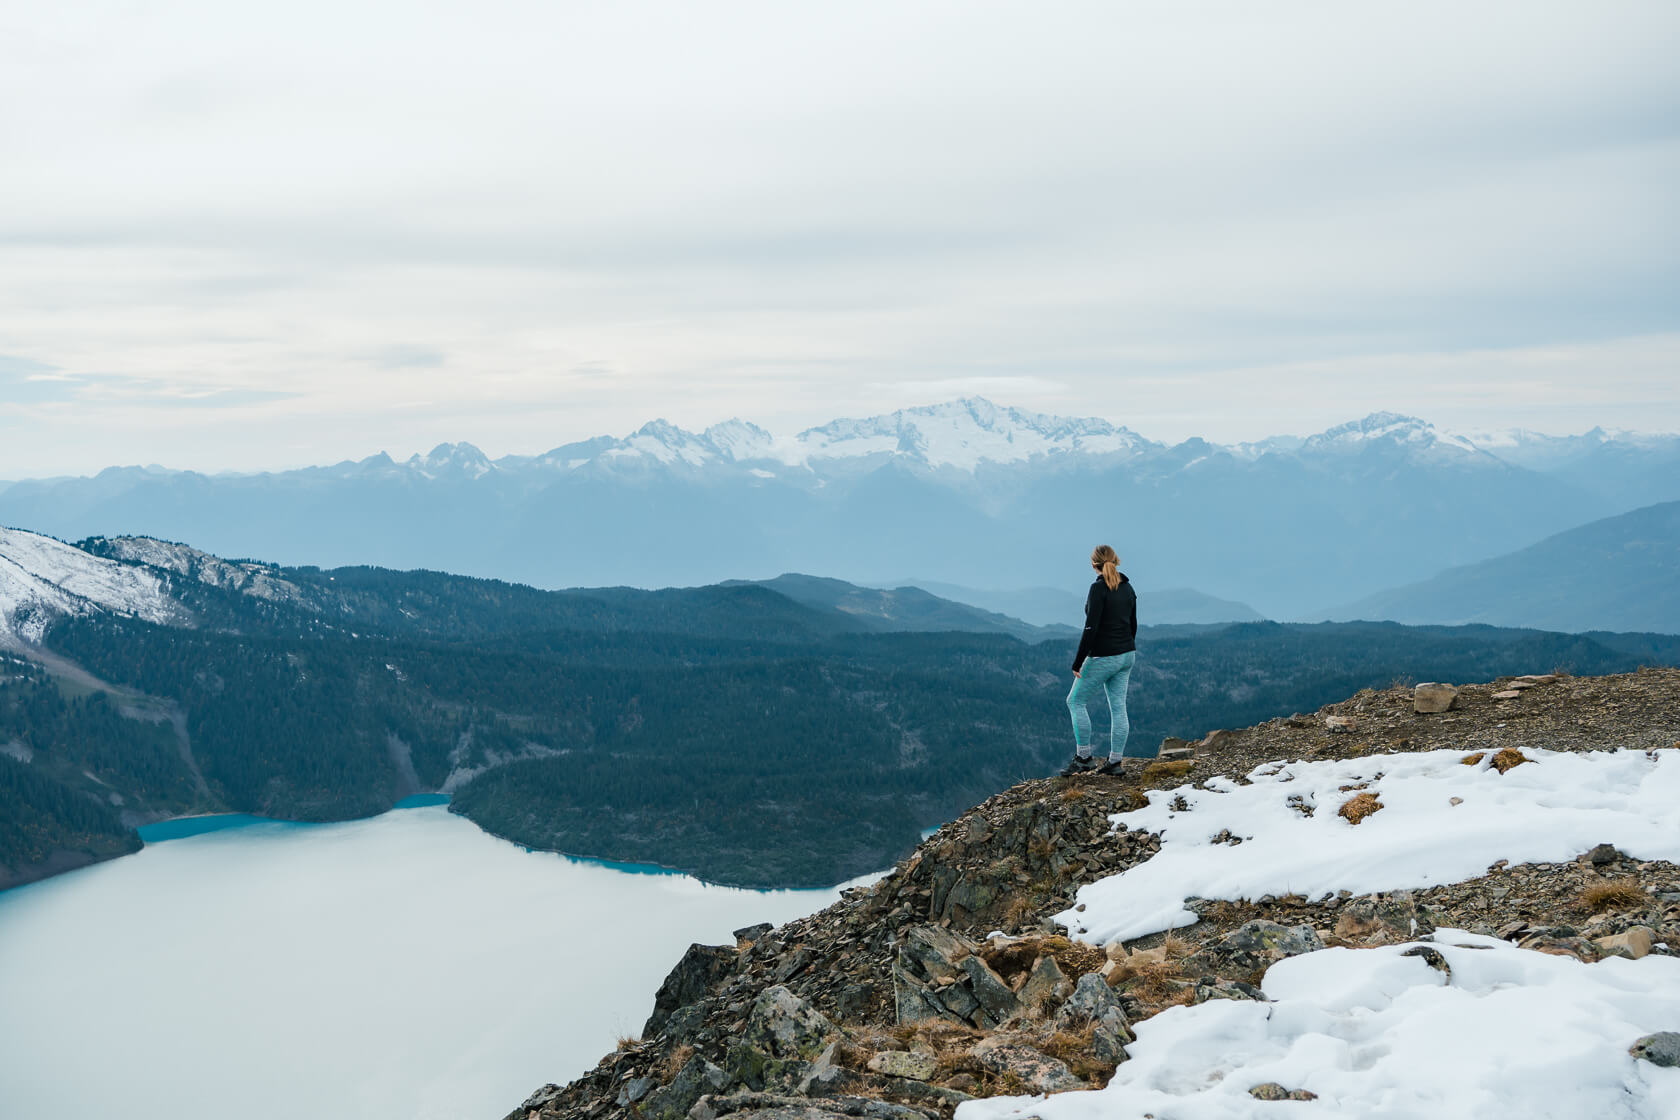
We’re not the first to dub Panorama Ridge one of the best hikes near Vancouver. People love this trail because it leads to a jaw dropping view of the crystal blue Garibaldi Lake and the surrounding mountain panorama. It’s difficult to fully comprehend how beautiful it is until you see it in person.
We won’t lie, this hike is hard work, but it’s worth every last step. Over the course of 30 kilometers, the trail passes through forests, meadows and across countless streams. It offers breathtaking views of the surrounding mountains including Tantalus Range and the iconic Black Tusk. In the summer, the meadows explode with colourful wildflowers and the lake turns a beautiful turquoise-blue colour. Seriously, this place is a gem for hikers, backpackers, photographers and anyone looking to get away from it.
Is One Day Enough for the Panorama Ridge hike?
Let’s first get this common question out of the way – can you hike Panorama Ridge in a single day?
Absolutely, you can!
But it’s essential to know your abilities before taking on such a challenging hike. The total elevation gain is around 1600 vertical meters and the distance is over 30 kilometers. If you go into this hike unprepared and with unrealistic expectations, you’ll tire yourself out, run out of food and water, and have a miserable experience!
But with some research and training, you’ll be ready both mentally and physically. That way, when the hike gets tough (and it will), you’ll be able to keep pushing through with a positive mindset.
Here’s everything you need to know if you’re thinking of hiking up to Panorama Ridge in one day.
Planning considerations:
Distance: 32.55 km
Elevation gain: 1,645 m
Difficulty: Hard
Best time to hike: Summer and early fall
Pure moving time: 9h (moderate pace) as measured by our AllTrails app
Dogs: No, dogs are not allowed on this or any other trails within the Garibaldi Provincial Park.
Pit toilets: You’ll find pit toilets at the Rubble Creek car park, the 6km fork and both Taylor Meadows and Garibaldi Lake campsites.
When should you hike to Panorama Ridge?
People underestimate the snow on the Panorama Ridge trail all the time. Even in late June, there can still be snow in Garibaldi Provincial Park. Unless you’re an experienced hiker, we wouldn’t recommend attempting Panorama Ridge outside of summer. The weather is unpredictable, there’s a lot more snow and some of the terrain past Taylor Meadows is considered challenging avalanche terrain by Avalanche Canada.
This guide is intended for summer hikes only, with the best months for first-timers being July and August. September may also be fine, though days are much shorter so that’s something to keep in mind.
Getting There: Trailhead, Parking Permits and Facilities
The hike starts at the Rubble Creek car park, about 1.5 hours from downtown Vancouver. During the summer season (mid June to early September) and on weekends and holidays in the fall (early September to mid October), you’ll need to book a day-use vehicle permit. Permits are free and can be booked two days ahead starting at 7 a.m. However, they go quickly, sometimes within 2 minutes, so be prepared. From mid-October to early June, permits are not required, but always double-check the exact dates on the BC Parks website.
Getting to the Rubble Creek car park is easy. Simply follow the Sea to Sky Highway and after Squamish keep an eye out for the sign for the Black Tusk. Then it’s just a few kilometers on a well-maintained paved road. Before you reach the car park, one of the park rangers will check your pass so be ready for that.
Side note: There’s also another hiking route from Cheakamus Lake parking lot but it’s much longer and we wouldn’t recommend it unless you’re backpacking.
Trail Options and Route Recommendations
There are two main routes to Panorama Ridge: one via Garibaldi Lake and another through Taylor Meadows. Most hikers prefer the Taylor Meadows route on the way up as it’s shorter with a steady incline, saving the lake for a refreshing dip on the way back. That’s exactly what we did when we hiked to Panorama Ridge for the first time.
The trail is clearly marked at every fork and intersection, so it’s not easy to get lost. Still, we wouldn’t go without an offline map or a hiking app like AllTrails.
Panorama Ridge Hike: Route Overview ( summer and early fall)
Starting Out: Rubble Creek to Taylor Meadows
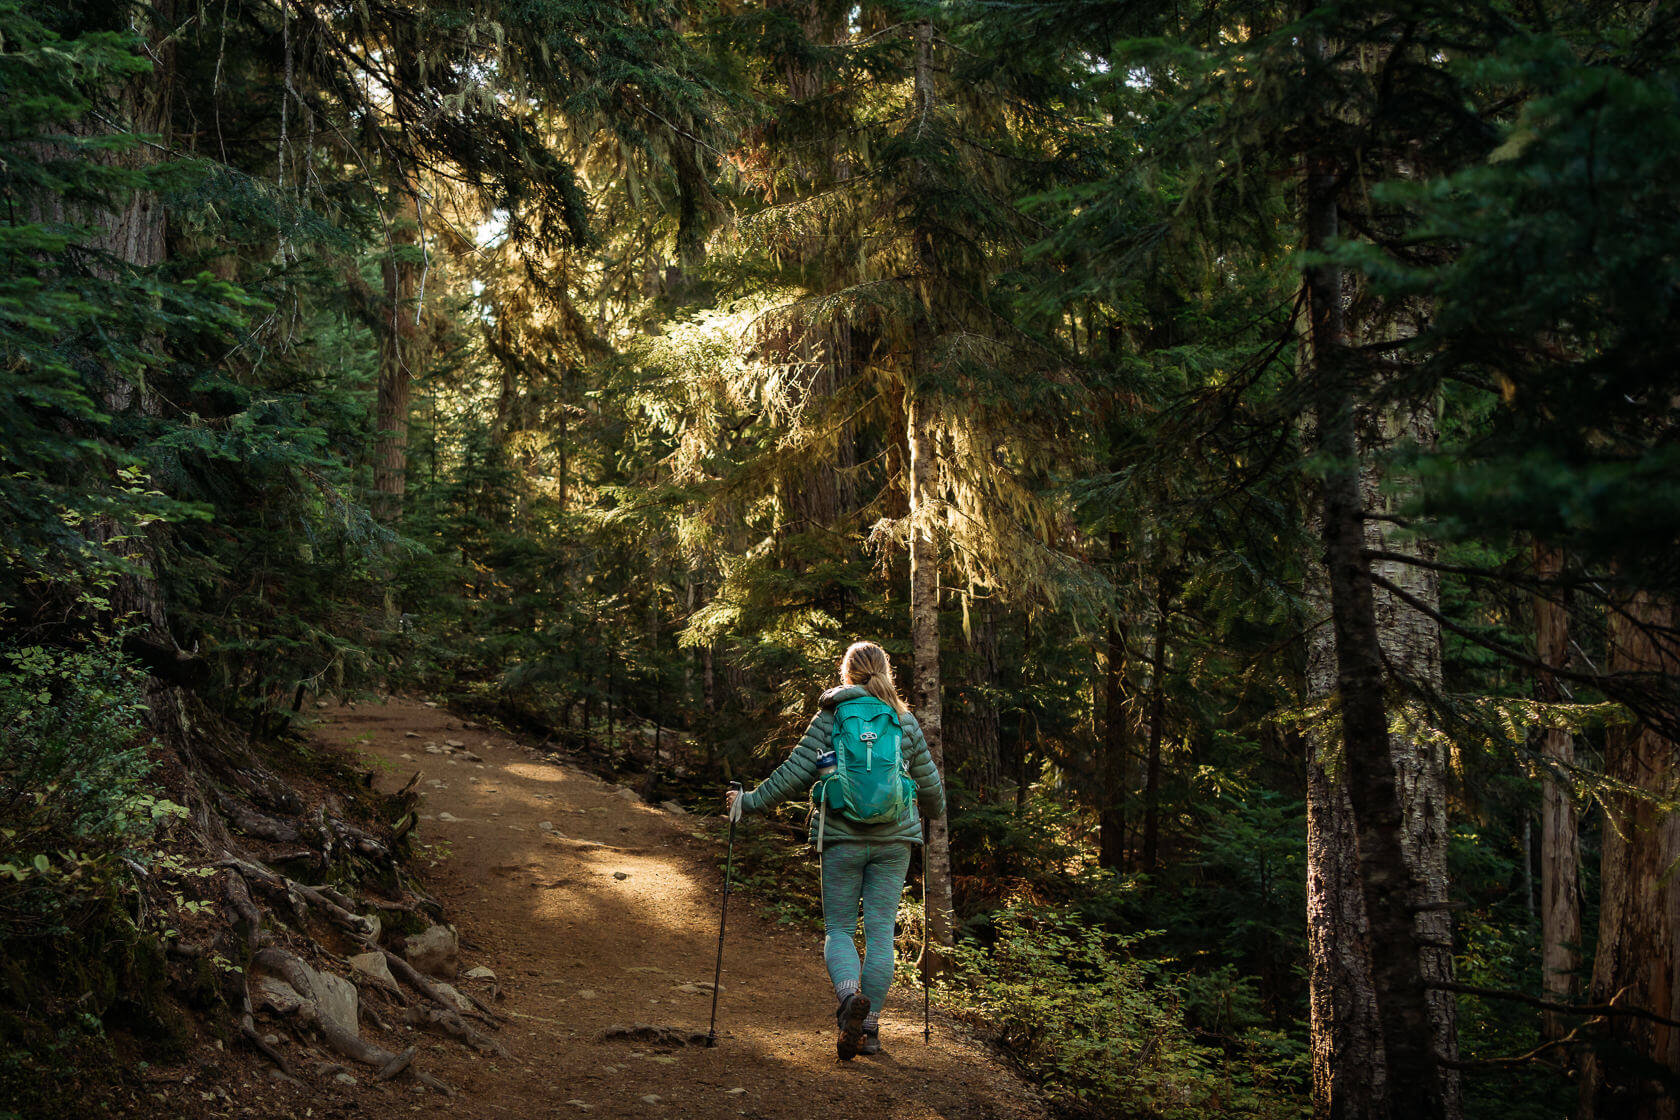
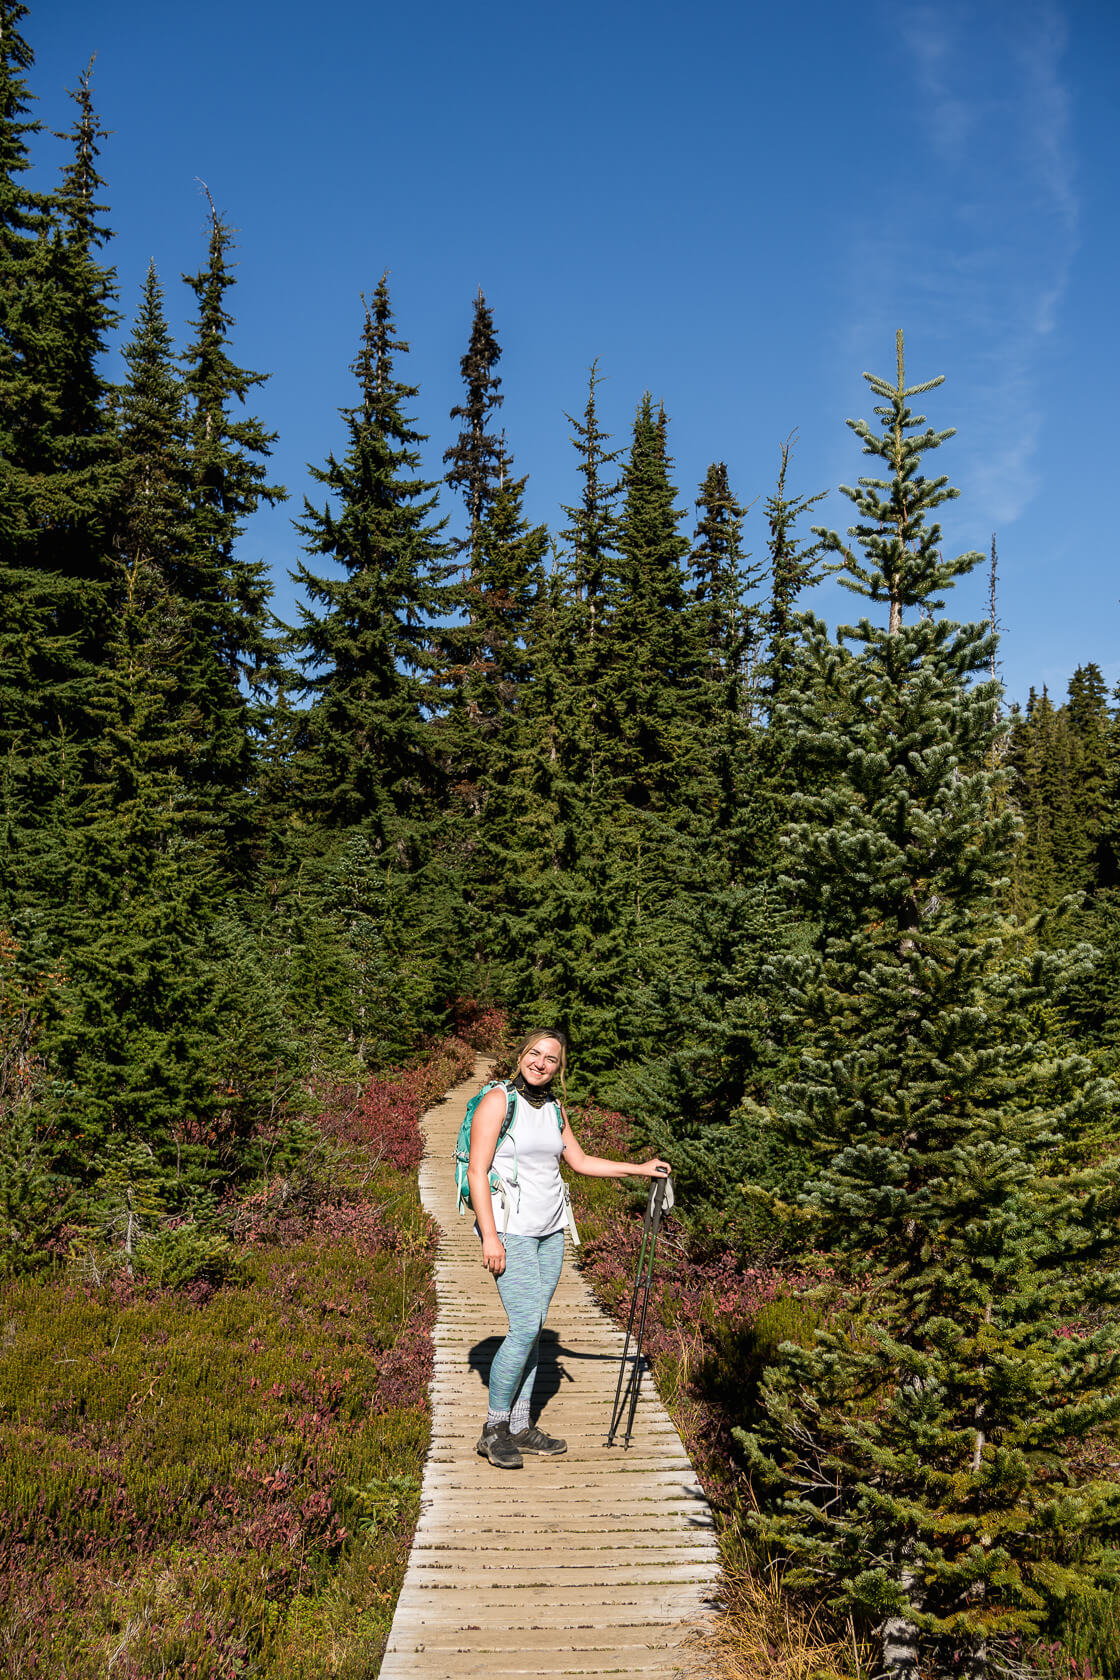
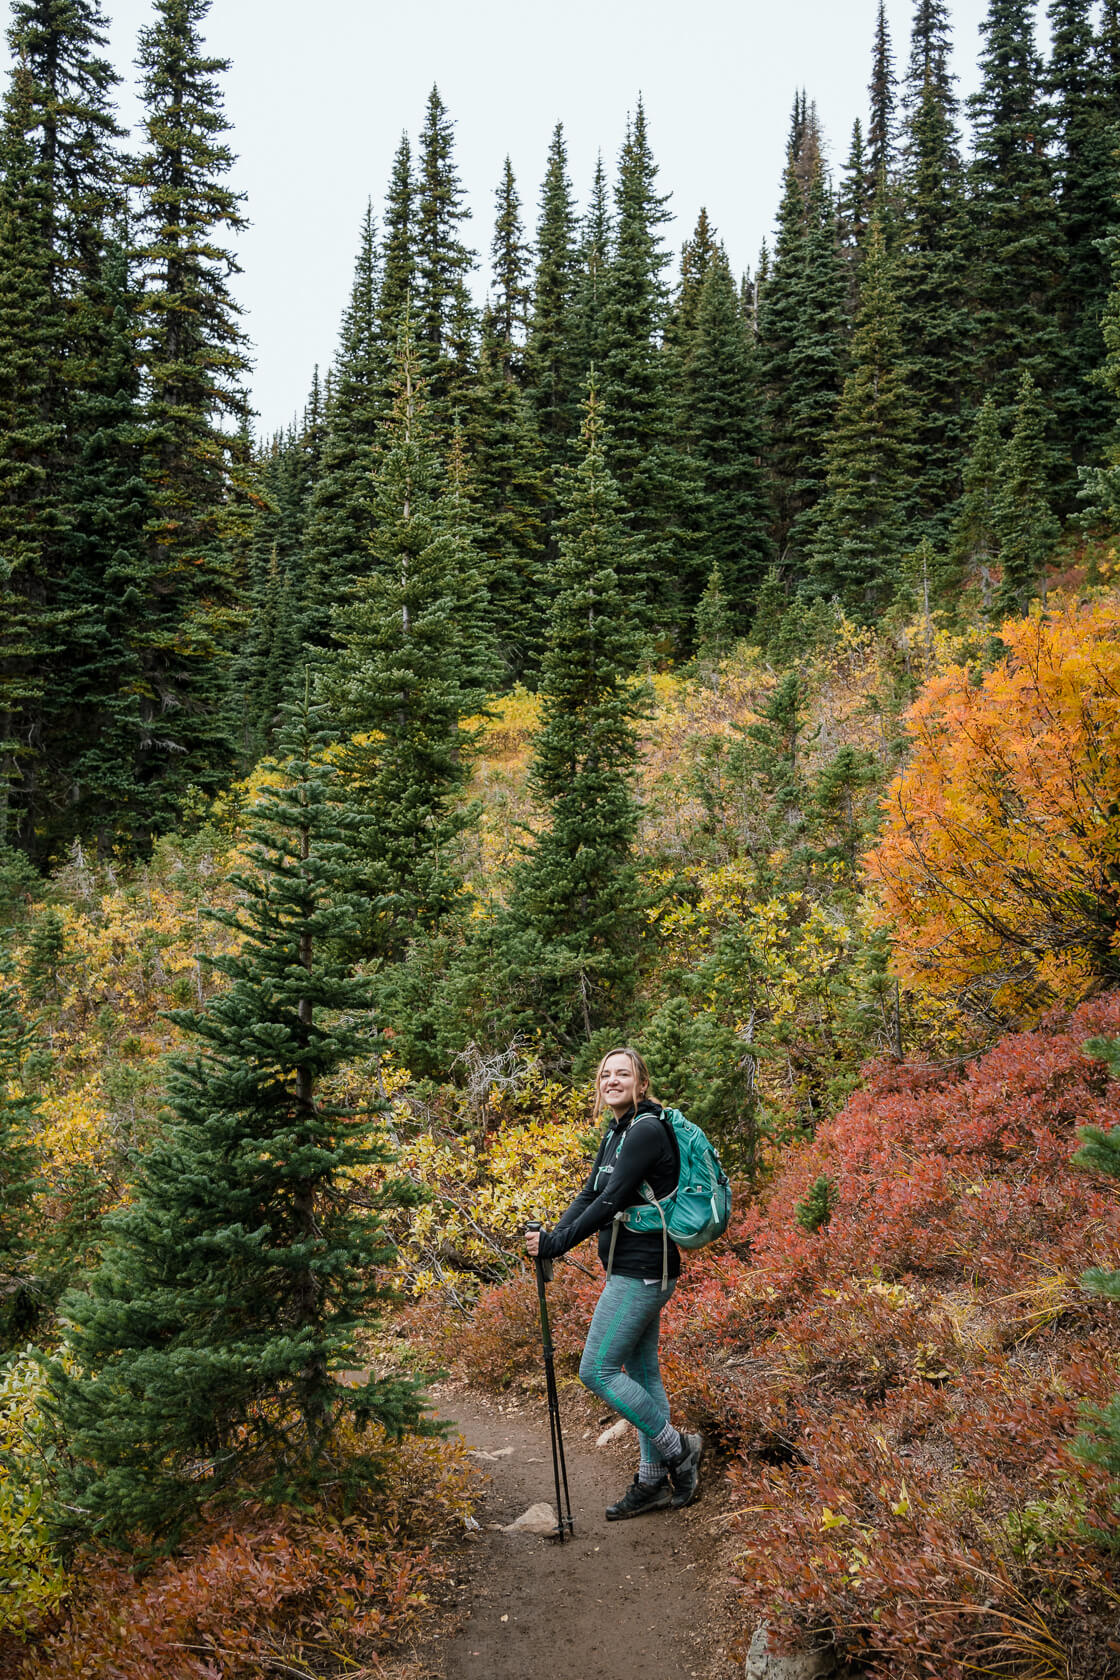
The hike starts like many other hikes in British Columbia – with a trek through the forest. For the first 3 kilometers, it’s a steady climb with a relatively modest incline. The hard work starts once you reach the switchbacks. This is the steepest part of the trail which feels like it will never end. The only other time you’ll be gaining so much elevation in such a short time is during the final push just before the summit.
After switchbacks, about 6 kilometers from the car park, you’ll hit a fork. You’ll need to choose whether to hike via Garibaldi Lake or Taylor Meadows. If you’re using the AllTrails app, it will recommend going via Garibaldi Lake on the way up and the meadows on the way down, but we suggest doing the opposite. Taylor Meadows is a shorter route to the ridge, so you’ll get there faster. Plus it’s a steady incline rather than another set of switchbacks. And the best part – if you go through Taylor Meadows on the way up, you can cool off in the lake on your way back down.
Taylor Meadows to Panorama Ridge
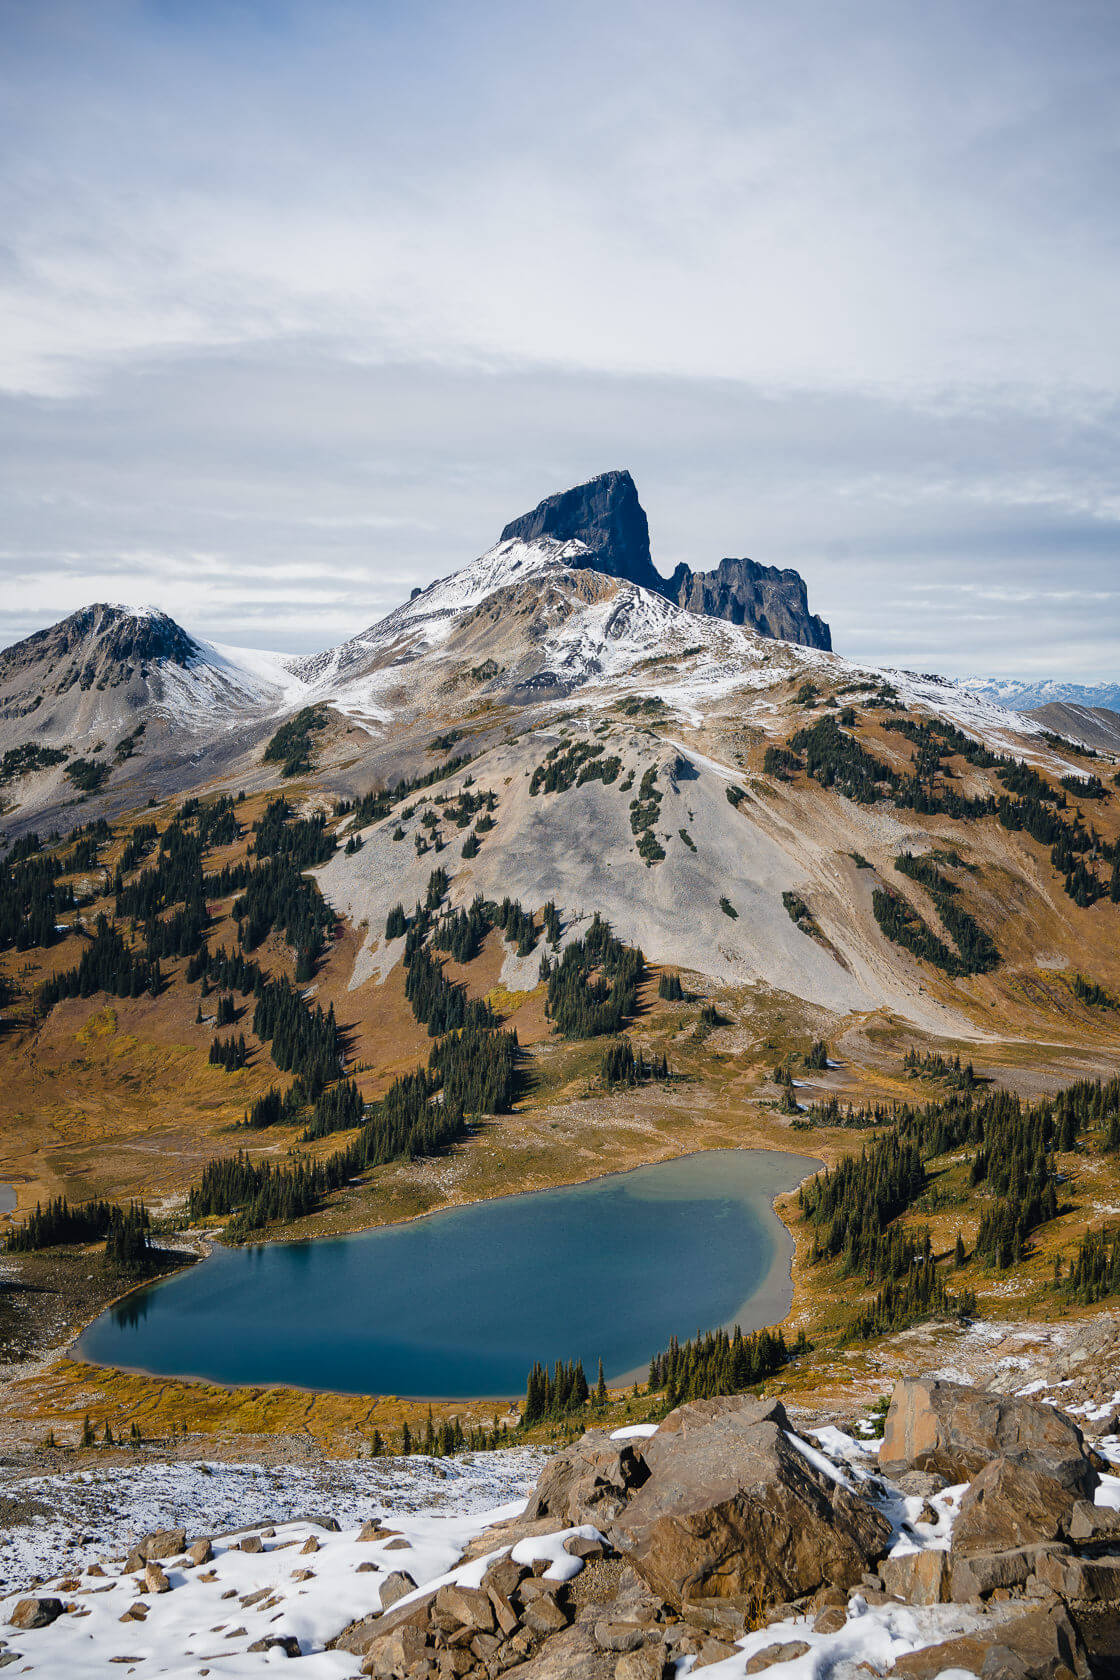
Before you reach the meadows, you’ll have to trek a bit more through the forest. But once you’re out, the rest of the hike is frankly breathtaking. The alpine meadows with the snow-covered peaks in the distance look stunning. Keep an eye out for the first glimpse of Black Tusk, which looks more like a cylinder than a tusk from this perspective. Don’t forget to turn around every now and then for some stunning views of the Tantalus range.
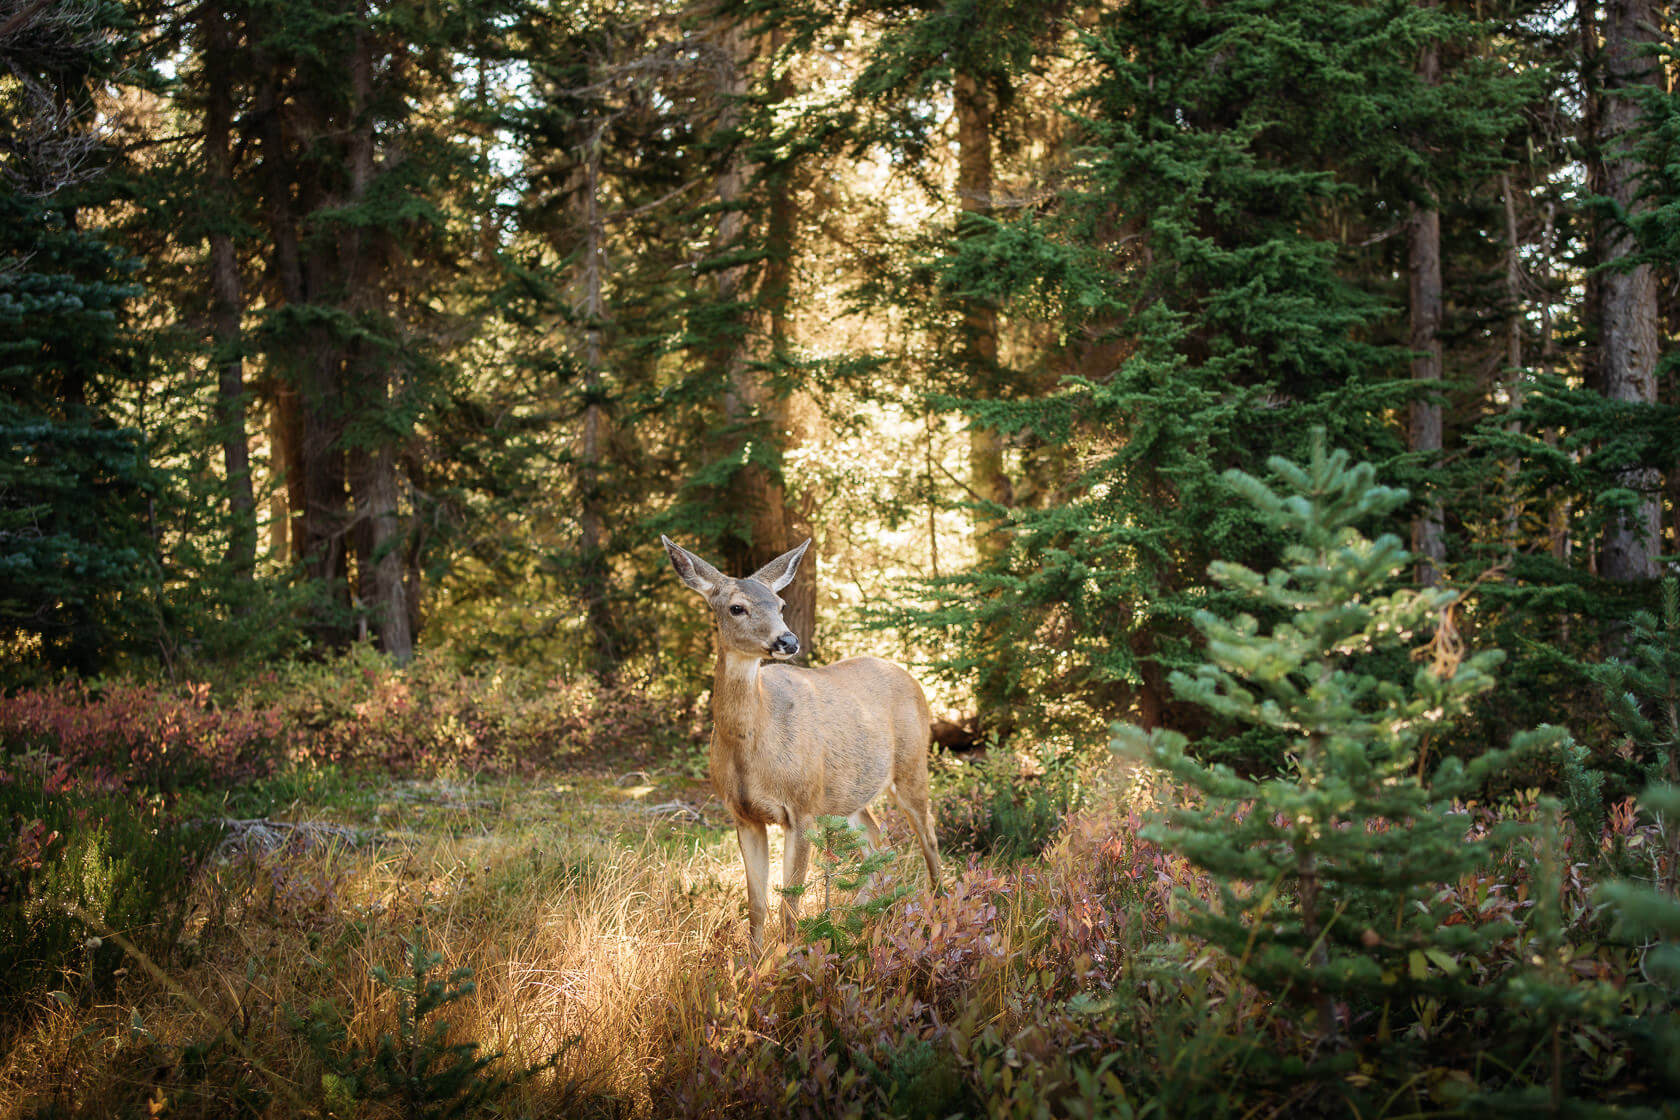
Although it might be tempting to wander off onto the meadows to get some photos, remember to stick to the path. It’s a very fragile ecosystem as it’s covered in snow for most of the year. Also, keep an eye out on the wildlife. We saw three deer at Taylor Meadows campsite. They came very close and didn’t seem to be fazed by us at all. Bears are also common in this area so make sure to carry bear spray. We didn’t see any, but the campsite was closed when we visited due to bear activity.

As you continue, you’ll soon see Panorama Ridge in front of you and more amazing views of Black Tusk. There’s an intersection with the Black Tusk/Cinder Flats Trail – continue straight, otherwise the trail will take you to Garibaldi Lake which is your return route. There’s another pit toilet here – it’s the last one on the trail and you’re only about 60% of the way to the summit!
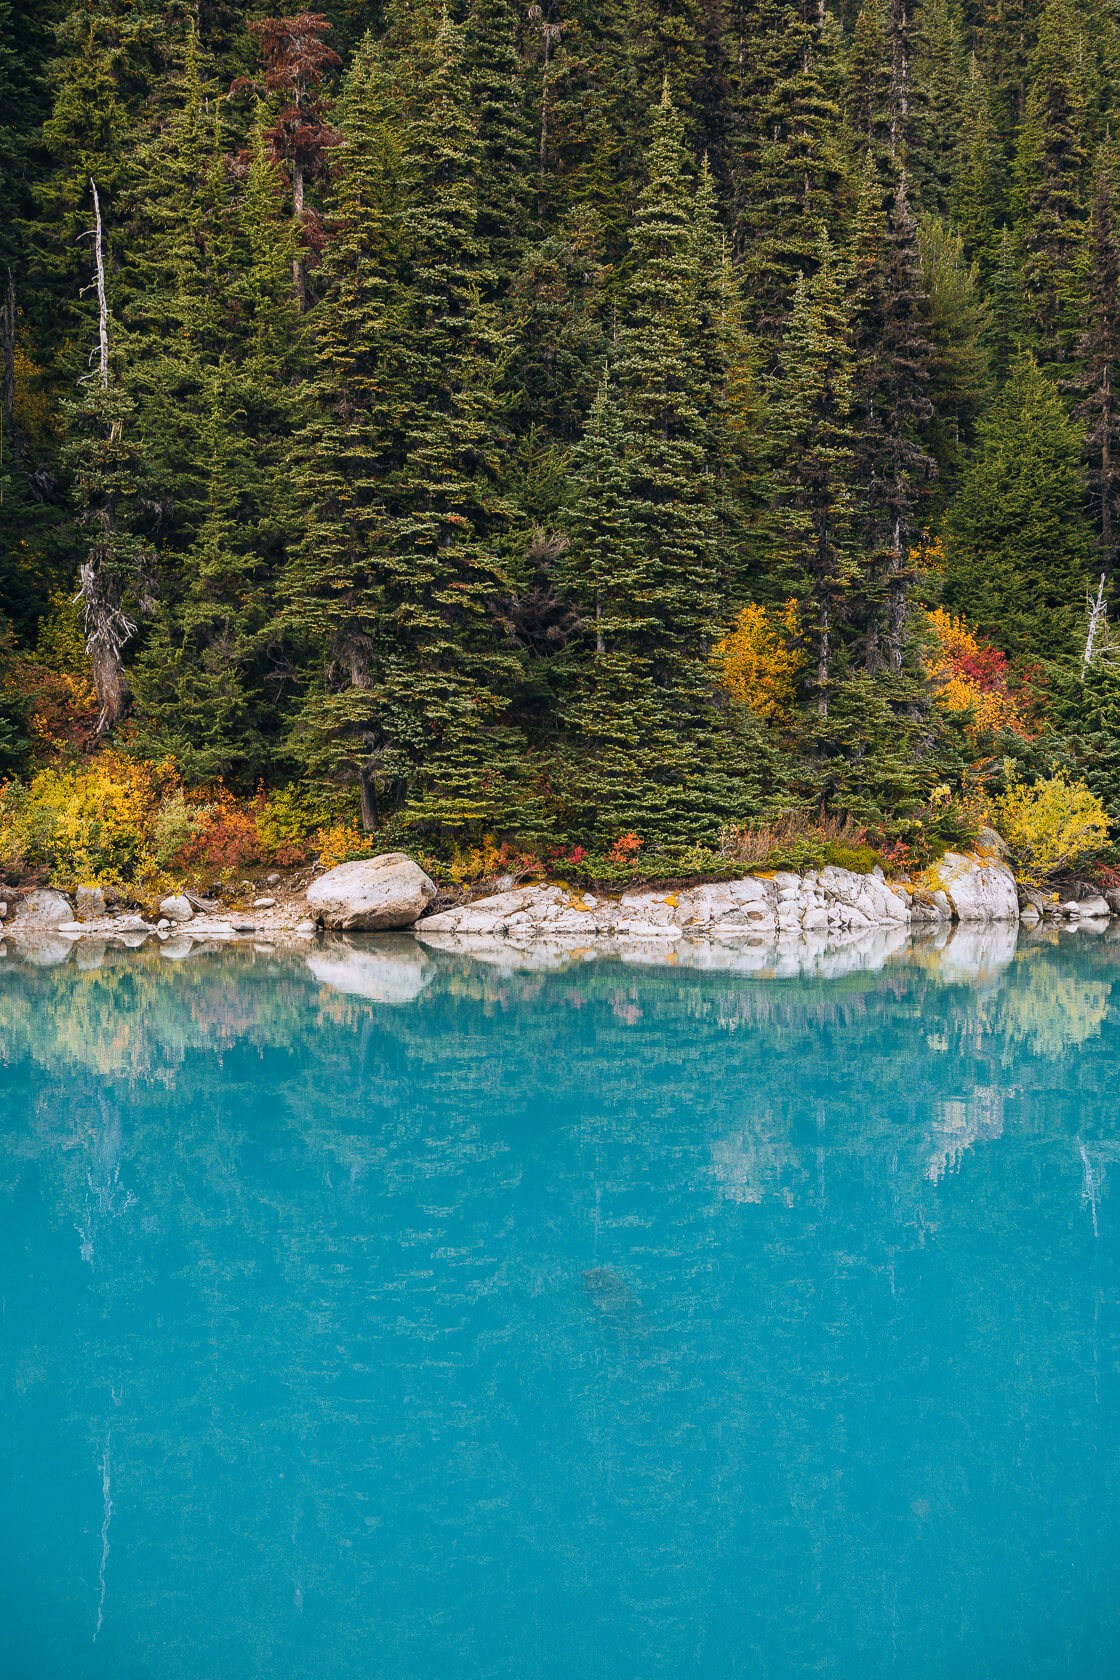
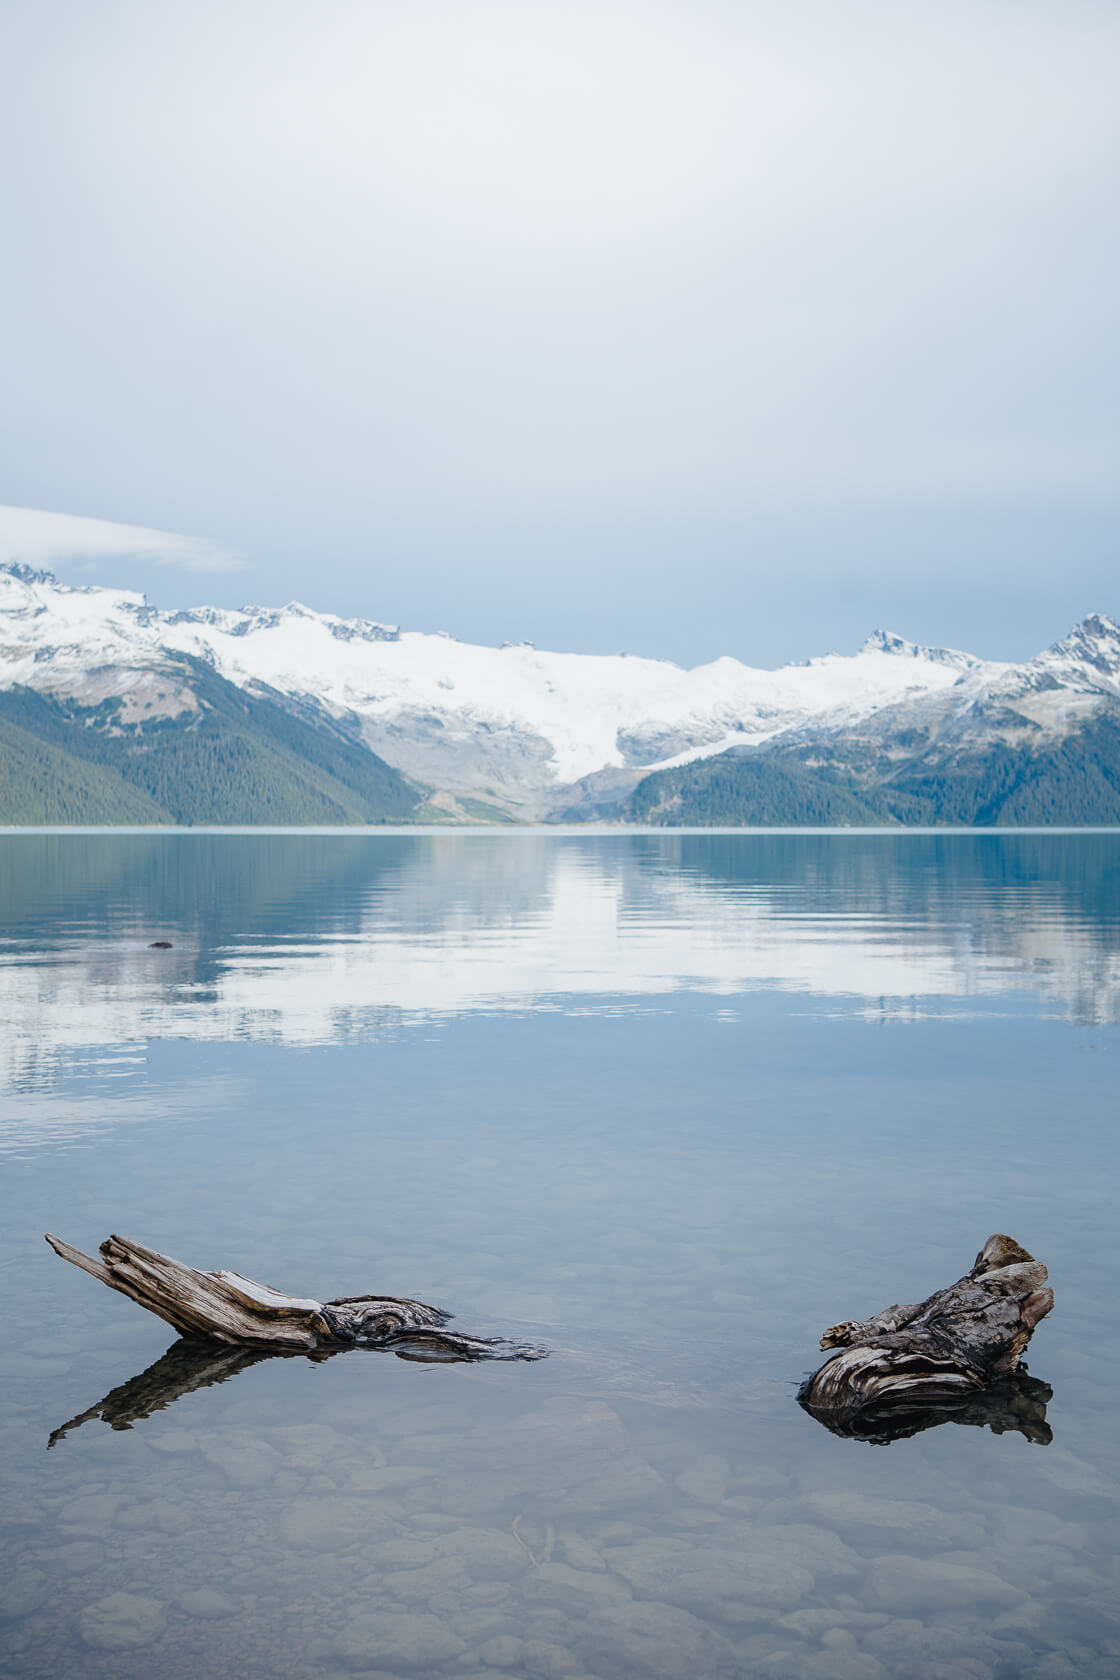
As you head towards Black Tusk meadows, the trail will stay relatively flat. You’ll see Mimulus Lake on your right, and soon after, the Black Tusk Lake. You’ll also catch the first glimpse of the turquoise waters of Garibaldi Lake.

Between these lakes, you’ll reach another fork and sign. Take a right. If you go left, you’ll end up on Helm Creek Trail leading to Cheakamus River. By the way, the mountain you see in the distance at the end of the valley is Whistler Mountain. This area is amazing for photos in literally every direction! Panorama Ridge, Black Tusk, Whistler Mountain and even Tantalus Range in the distance. Depending on the time of the year and weather, there might be lots of bugs and quite a bit of mud on this part of the trail – kind of as expected when you’re on a meadow!
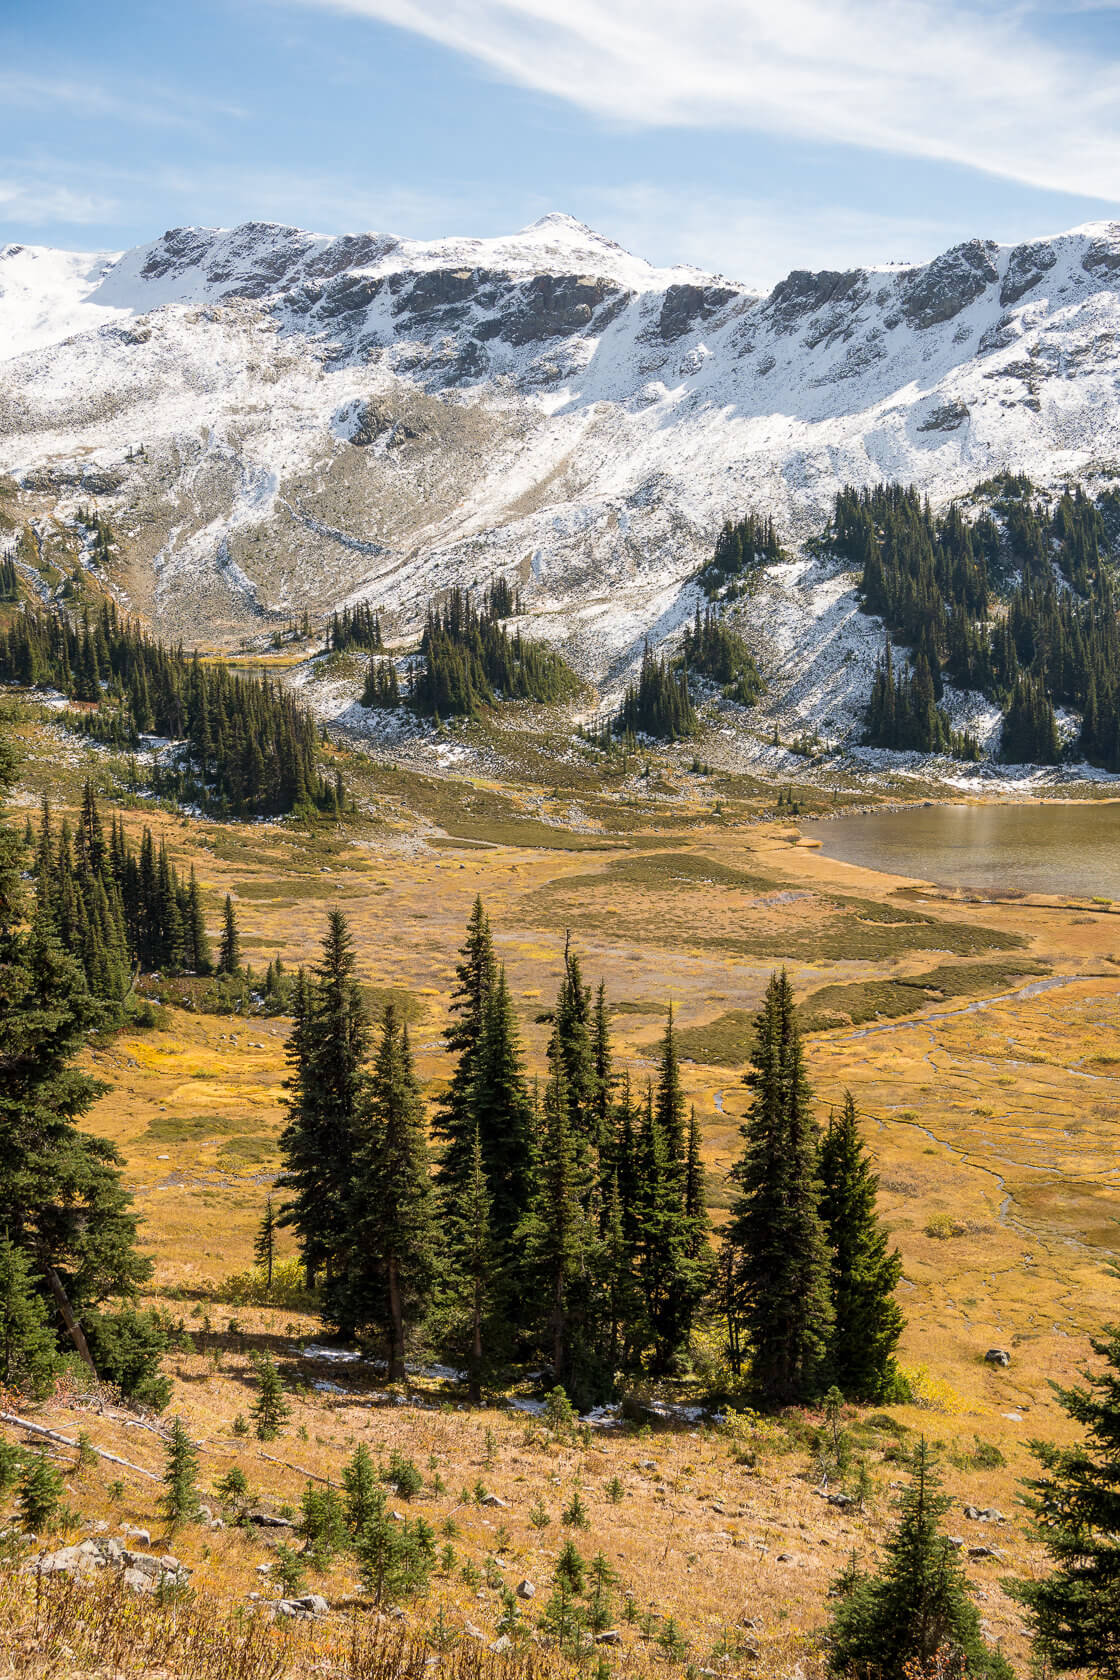
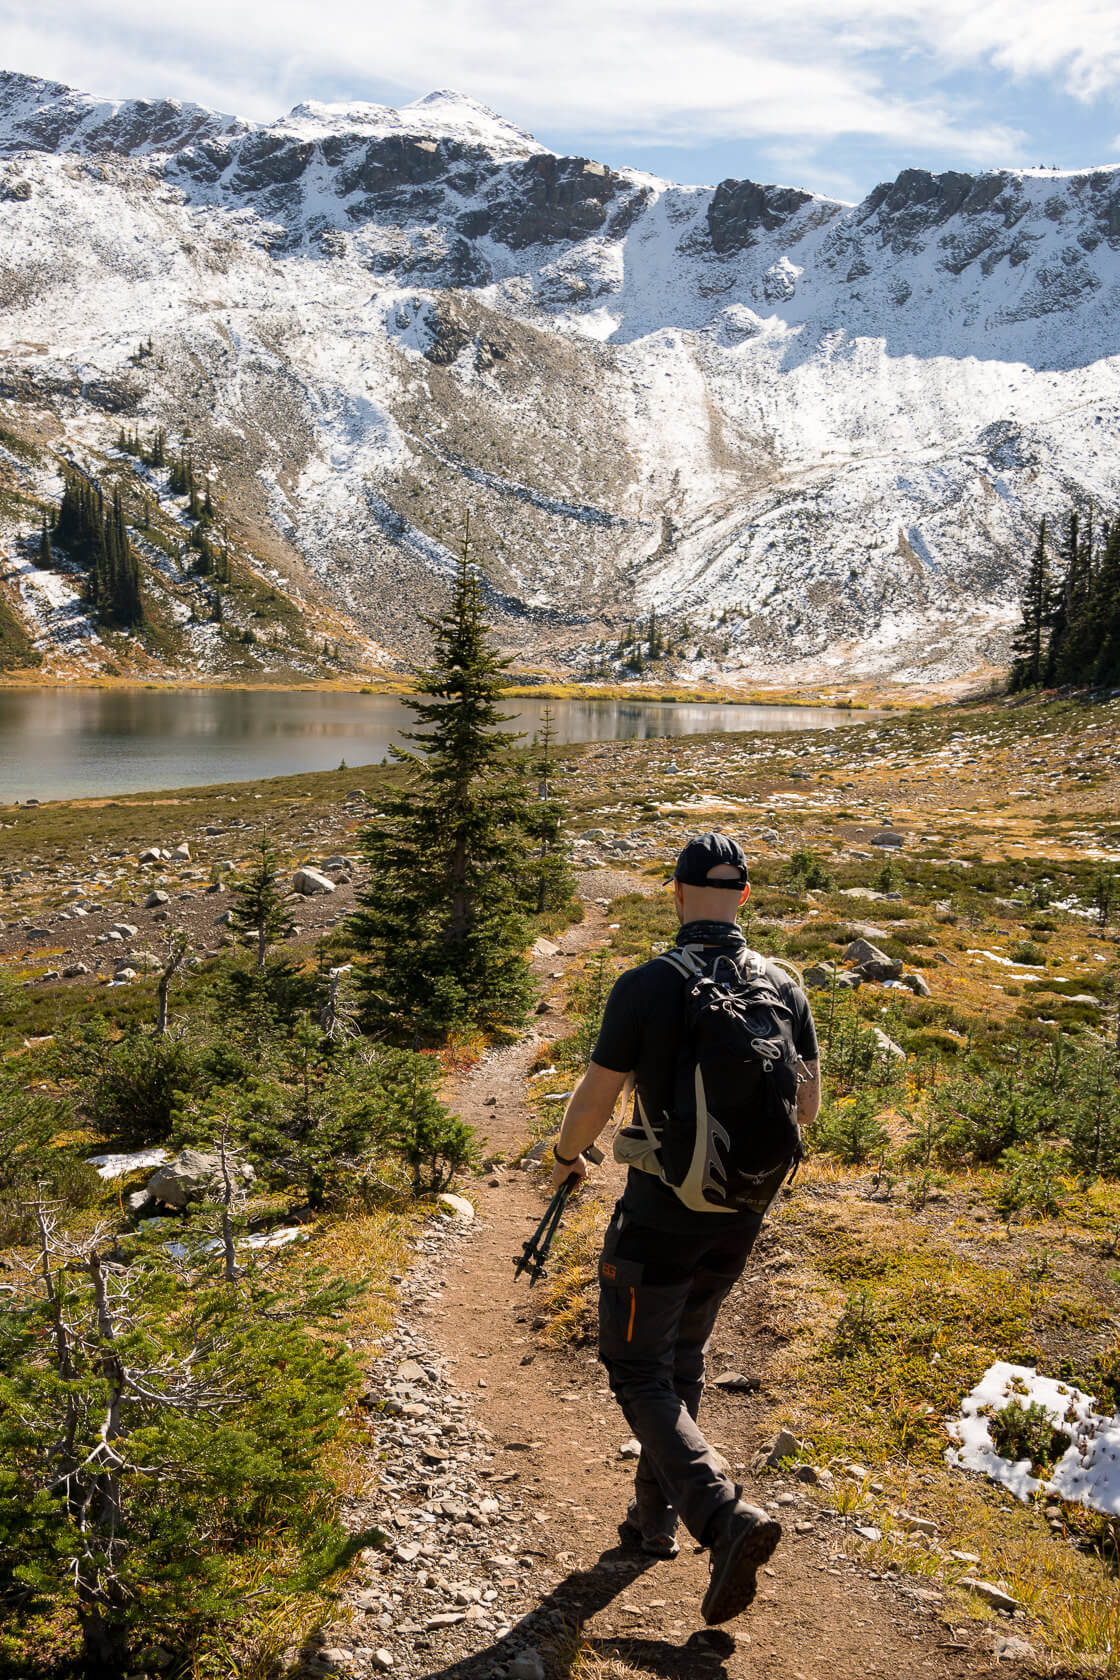
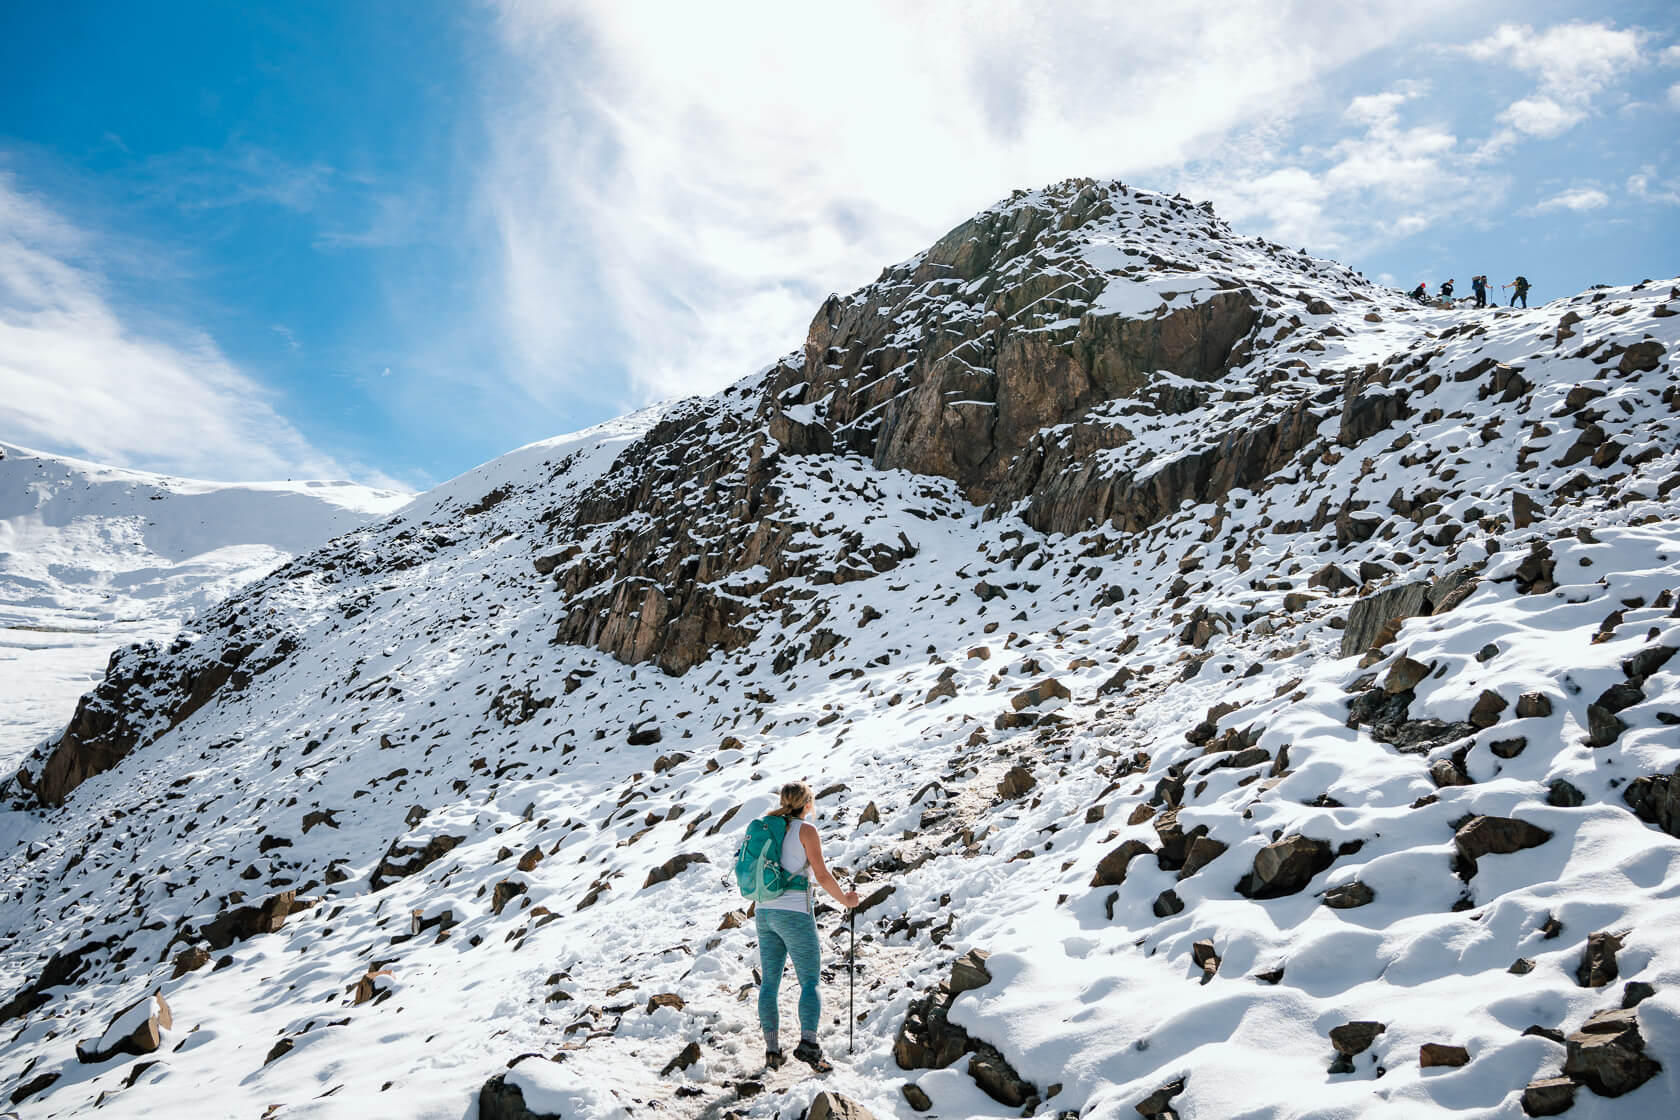
Onto the next part of the trail – the final push to the summit. Although this section is not crazy steep or difficult, you’d have already hiked around 14 kilometers at this point, so it may be a bit challenging. Expect around 400 vertical meters over a relatively short distance. The path gradually becomes more rocky and less defined, but it’s still easy to follow. You might need to use your hands a bit on this section but it’s not really a scramble.
Last time we did this hike in early October, there was already snow on the ground. We decided to put on microspikes and they helped a lot, even more so on the way down! Many people who weren’t wearing them were slipping and falling, so we would highly recommend bringing microspikes if you’re hiking in the shoulder season.
Panorama Ridge Views
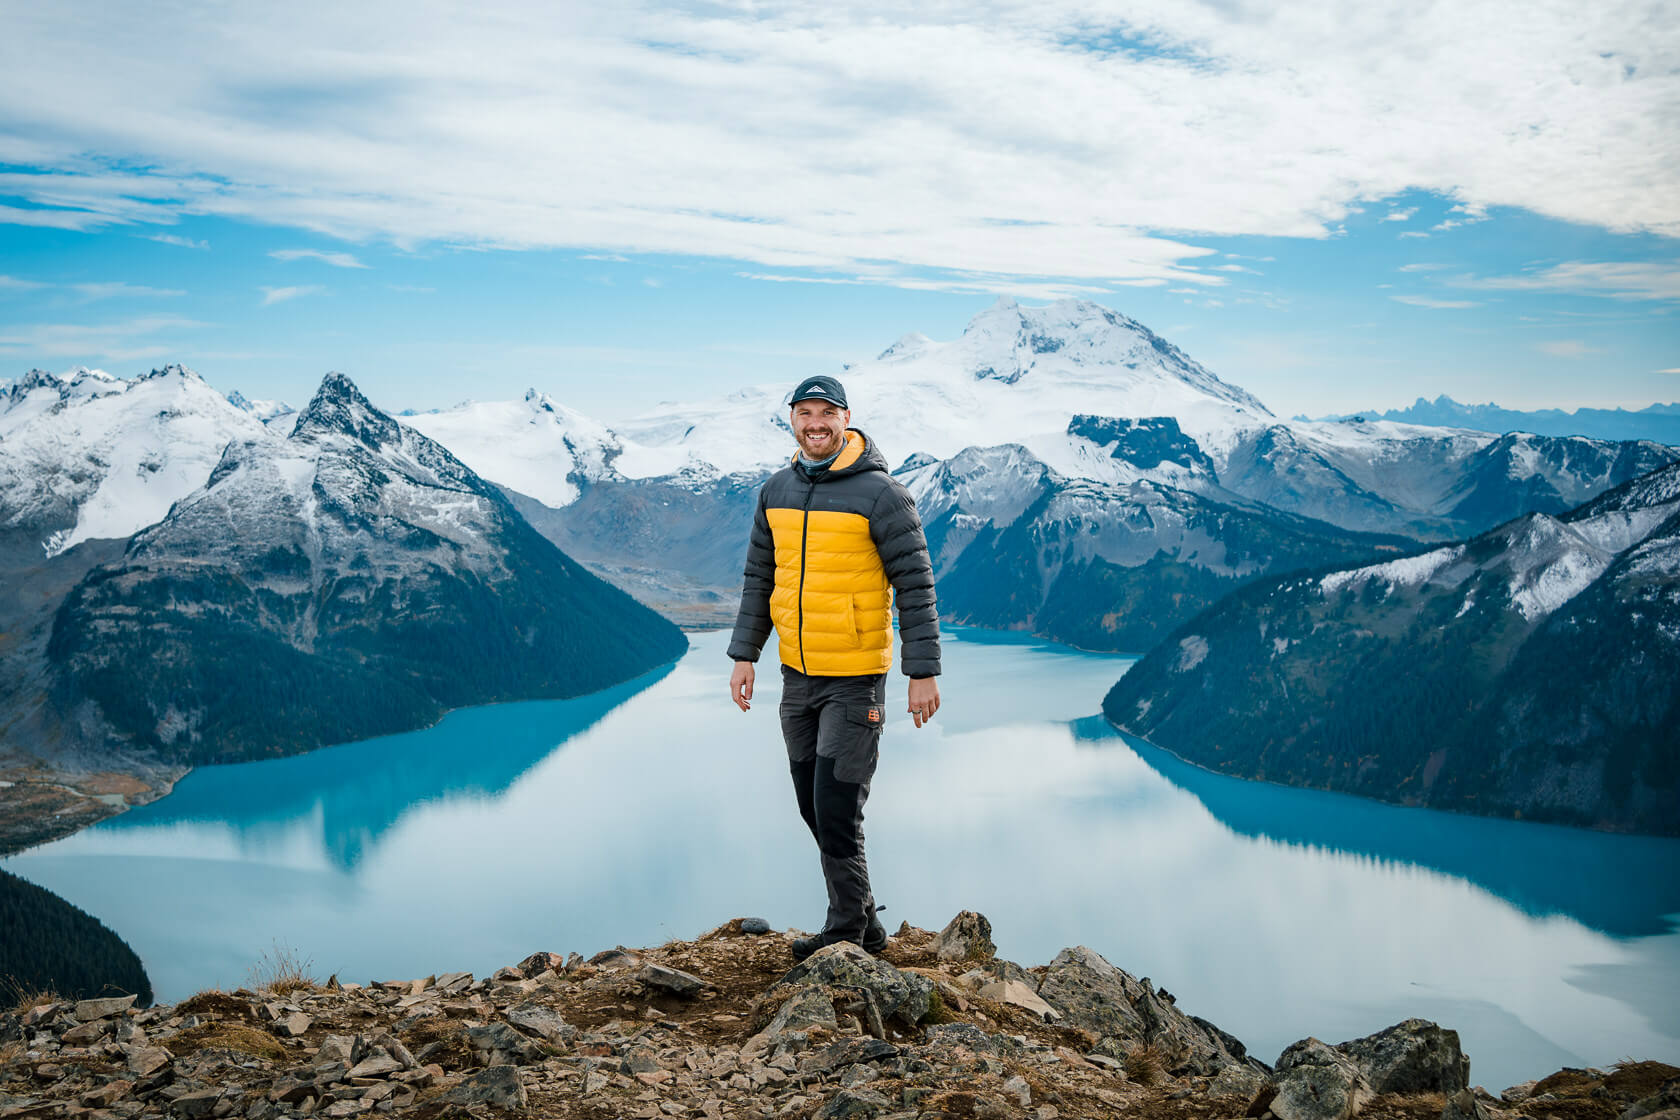
Once you get to the ridge, you’ll immediately see what the hype is all about as the views are nothing short of breathtaking. Definitely as amazing as in the photos you saw online or even better. Ideally you want clear skies to see that amazing deep blue colour of the water. That being said, the views are always beautiful here, even on a cloudy day.
There may be many other people on the ridge, but you can keep walking past the most popular spot to find somewhere quieter. We totally recommend this because there are plenty of opportunities to take great photos from other angles.
Descent: Returning via Garibaldi Lake
Once you get back to the Taylor Meadows fork, you’ll have to decide if you want to take the same route you took on the way up (via Taylor Meadows), or if you want to go left towards Garibaldi Lake. The Taylor Meadows route is shorter, but if you have time and energy, we recommend going towards the lake.
The trail starts off in the meadow and then takes you through the forest and some switchbacks all the way down to the lake. When you’re close to the lake, you’ll come to another fork. Here you can either go right, which will take you back to the car park (labelled as Black Tusk car park rather than Rubble Creek car park even though it’s the same place) but you want to go left to the lake. It’s only about 200 meters distance and 30 vertical meters and the views will be totally worth it!
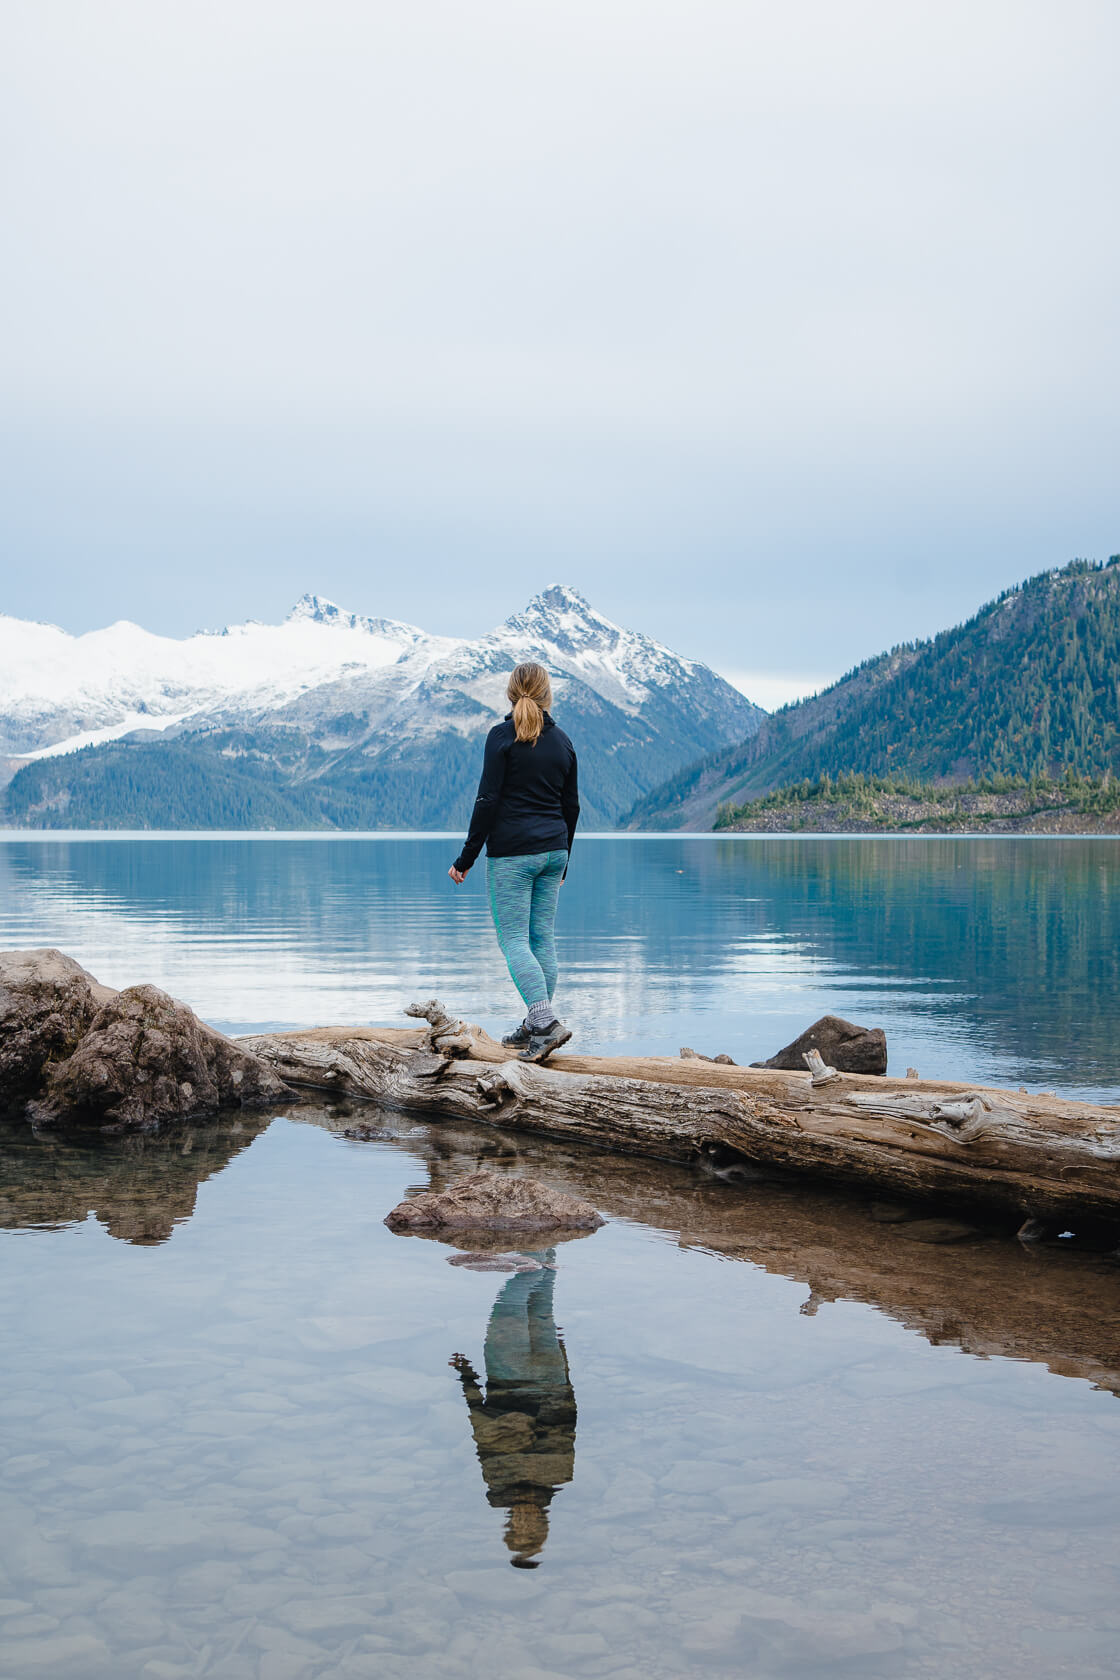
Cross the bridge separating Garibaldi Lake from Upper Rubble Creek and continue along the shore towards the camp site. The colour of the water on this section will blow you away. Once you’ve taken enough photos, take a break at the bench near the campsite. There are also pit toilets here which might be useful information. Personally, we didn’t have enough time (or weather conditions!) to go for a cold dip, but we definitely recommend stopping here, even if it’s just to rest for a bit and simply take in the view.

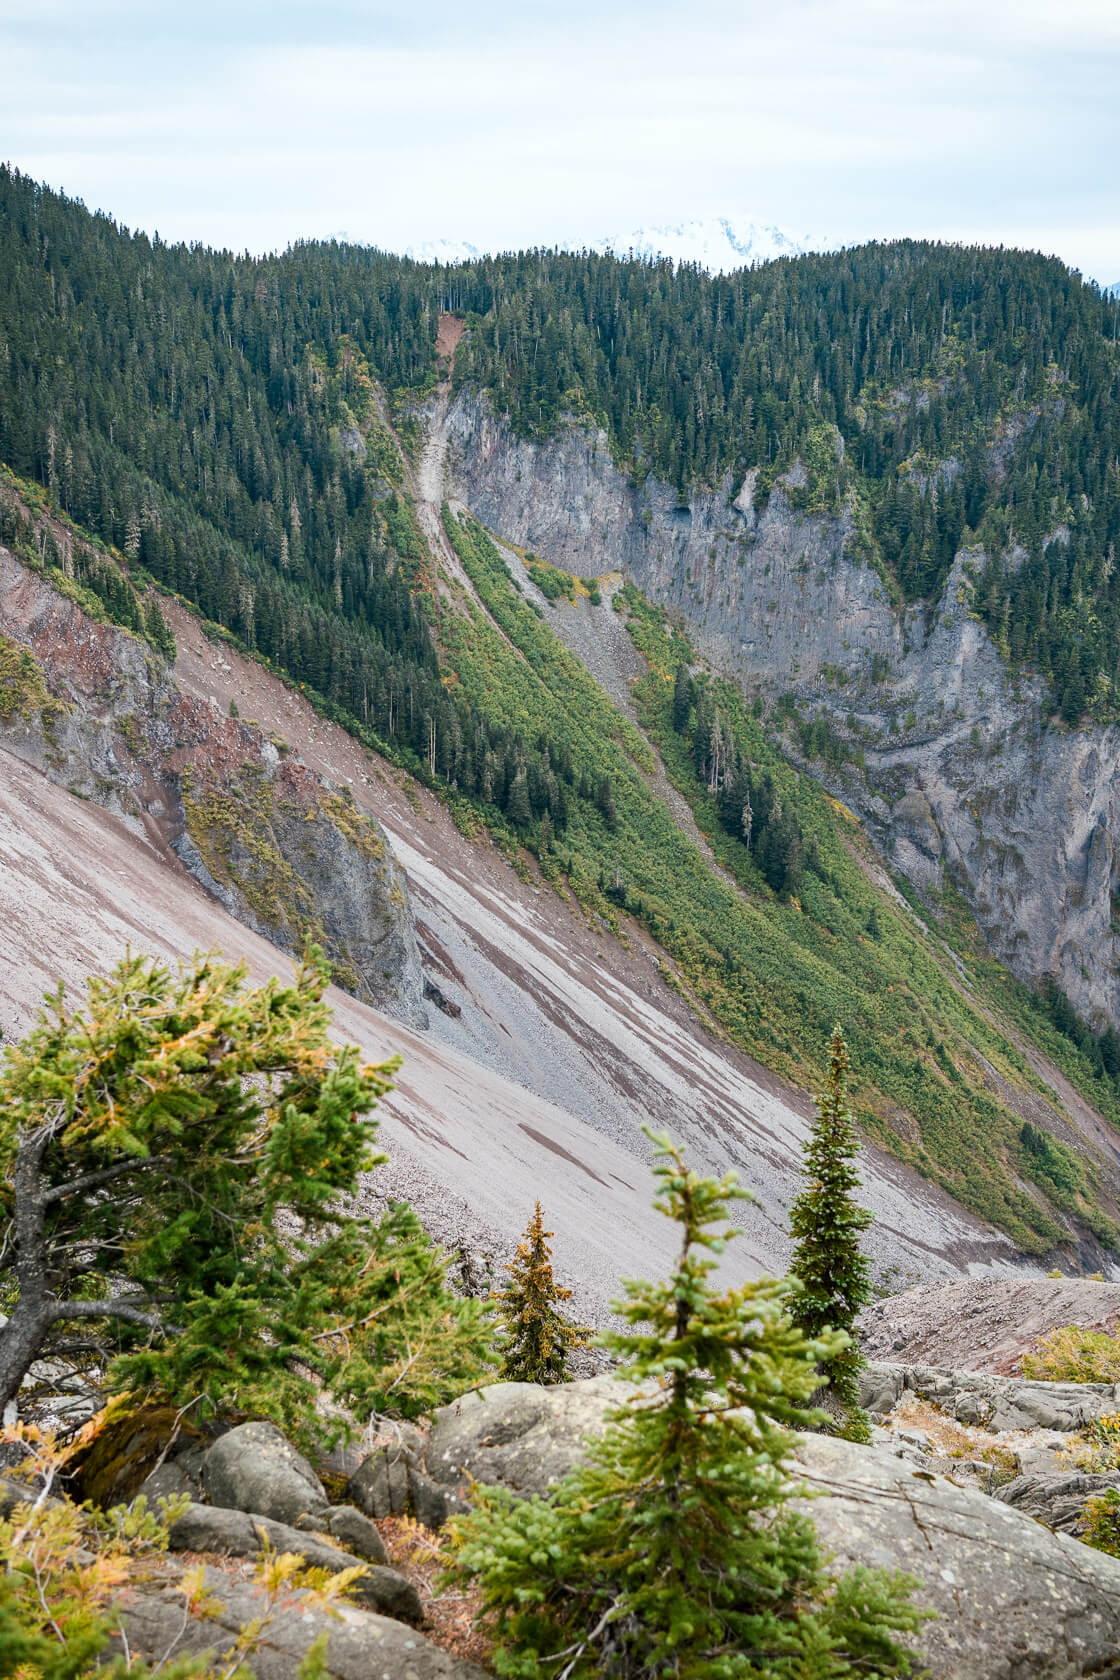
Once you get back to that previous fork, it’s 9 kilometers to the car park. There are a couple of small lakes along the way but they’re not worth another stop. You might just want to power through this section as quickly as possible. After the second lake, you can take a very short detour to The Barrier viewpoint. The Barrier is what holds the entire Garibaldi Lake system together. From a geological perspective, it’s certain that eventually the barrier will break and completely devastate Squamish. However, this is likely to happen hundreds or even thousands of years from now. From this viewpoint, you can see just one section of The Barrier and even that is pretty impressive.
About 200-300 meters later, you’ll get back to the same 6km fork you got to on the way up. The rest of the trail is just a long (6km) walk through the forest. When people say that the switchbacks on the way down are the worst because it feels like they’ll never end, they aren’t lying. Each kilometer feels like a lifetime when your feet are hurting with every step. But for us it was the last straight section after the switchbacks that was the worst. We initially thought it was only about 1 kilometer, but it’s actually still 2.5 kilometers to the car park. After such a long day, it seems to go on forever.
Practical Tips for Your Panorama Ridge Hike
Build up your stamina before the hike
Hiking is no rocket science but you’ll be walking over 30 km and gaining almost 1600 m elevation – that is a lot! Even with our experience on many 25+ km hikes with 1000+ meters of elevation, Panorama Ridge still hit us pretty hard.
So get out there, do a few shorter hikes first, see how you feel and you’ll have a pretty good idea whether or not you’re ready to hike Panorama Ridge.
Also, consider the experience and fitness level of the people you’re going with! It will be good for all involved.
Download an offline map
This may be a popular trail with good signage but you should never go into a hike without an offline map. There are many different hiking apps out there, but AllTrails is the most popular. If you have the AllTrails+ subscription you can save the hiking route directly in the app. This way you won’t get lost, even if there’s no cell coverage. Get AllTrails app here.
Pack what you need!
It should go without saying if you’re attempting this hike, but dress in easy-to-add or remove layers, wear comfortable hiking boots with good grip and wool socks to prevent blisters. We would encourage waterproofs to be in your backpack too.
As for gear, here are some things we would recommend you have specifically for the Panorama Ridge hike:
- Head torch or flashlight for the hike back down. The last thing you want to happen is to get caught out in the dark with no light. It can mean going off trail and getting lost. We sometimes see people use their smartphones on trails but on a long hike like Panorama Ridge it really isn’t a smart thing to do as you can easily run out of battery.
- Bear spray. The most potential for bears is near Taylor Meadows and Garibaldi Lake campgrounds. It can be mildly terrifying to see a bear on the trail, especially if you’ve not encountered one before. But know that bear attacks are very rare and you are not worth bears’ time unless you surprise them, approach them or behave in a way that ticks them off. Here are two informative websites where you can learn about how to behave if you find yourself in an encounter: North Shore Bears, BC Parks.
- Sun protection including sunglasses, sunscreen, and perhaps even a sun hoodie as most of the trail to the ridge is exposed to the sun after the Taylor Meadows.
- Bug spray. In the summer you’ll be dealing with horse flies and mosquitos.
- First aid supplies like pain relief tablets, moleskin for a blister or a wrap for a sprained ankle etc
- Hiking poles to save your knees on the descent.
- Water filter bottle or tablets to reduce the weight in your backpack.
- Power bank for your phone.
- Extra layer for the ridge/summit. Even if you’re hiking in shorts and a t-shirt in full sun, you may be in for a surprise at the ridge as it often gets windy. If you plan on spending some time up there admiring the view, taking photos or having lunch, an extra layer will help you shelter from the wind and make your time up there more enjoyable.
- Trash bag so you can carry out your empty packets, used up toilet roll and other waste.
- Hand sanitizer.
- Microspikes – depending on when you go, the last section of the trail just before the ridge may have a strip of snow that you will have to hike through to get to the ridge. We recommend reading recent reviews on the AllTrails app to see what people who just completed the hike are saying.
Fuel, fuel, fuel
When you’re hiking, you are expending a lot of energy, so make sure you give your body adequate nutrition. It can mean the difference between dragging yourself to the finish and finishing strong. How many calories do you need for a full day of hiking? Pack that and a little extra. Also bring good snacks like nuts, dried fruit, hard cheese etc
Bring enough water
There is no drinkable water at the trailhead and both campsites, so you should plan to bring all the water you think you will need. There’s no firm rule on how much to bring, but we suggest two 1-liter water bottles along with a water filter or water treatment tablets so you can refill along the way. That being said, everyone’s needs are unique and this is just a good place to start.
Check Weather Forecast
Check the weather forecast for the area and don’t assume that the weather at the ridge will be the same as at the start of your hike. The peak of Panorama Ridge sits at 2,133 m! You can do this using the Mountain Forecast website. As Panorama Ridge is not listed, check the weather at Black Tusk which is the closest peak.
Check Latest Trail Conditions on Panorama Ridge trail
Read reviews from other hikers on the AllTrails app as they will tell you a lot about the latest trail conditions. Also consider joining a couple of hiking groups on Facebook where you can ask questions and read recent hiking reports. One such group is Hiking British Columbia.
Book a day pass in advance on the BC Parks website
As we already mentioned above, you need a day pass to access the car park and hike in Garibaldi provincial Park. Scroll up to the section Getting There: Trailhead, Parking Permits and Facilities.
Tell someone your plans
Let someone you’re not hiking with where you are going and when you’re expecting to be back (even if you’re hiking in a group). If something happens, it will be a huge relief to know that they know your location and will send help.
Start early
No matter whether you choose the Taylor Meadows or the Garibaldi Lake route, this will be a long day in the mountains. Unless you’re a fast hiker, you should expect Panorama Ridge to take you anything from 9 – 12 hours excluding breaks, which means you may have to hike down in the dark. If you don’t want to hike in the dark, start early so you can enjoy all the activities and finish early!
Accept that it’s okay to turn around
There is absolutely no shame in not finishing a hike or turning around early. There may be factors outside your control that make the hike unsafe such as bad weather rolling in, trail damage, injury etc. Don’t risk your life and others’ to prove you can do it. The trail will always be there.
Final Thoughts on Panorama Ridge
Panorama Ridge is a spectacular hike that’s worth every step. With preparation and determination, you’ll be rewarded with some of the most stunning views British Columbia has to offer.
Got more questions about the Panorama Ridge hike?
Just drop them in the comments, and we’ll be glad to help!
We have hiking guides for other hikes in Garibaldi Provincial Park such as Elfin Lakes and Wedgemount Lake. Or you can read about other hikes in British Columbia here.
